

Due to the exorbitant fees imposed on the Ethereum network, using the network on crypto transactions seems to be alarming. However, you can lessen the GAS fees imposed on the Ethereum network by connecting to other relevant blockchains like Avalanche, Binance Smart Chain, as well as the Polygon network. Meanwhile, you’ll need to connect to a supported wallet before you can use these alternative networks.
One of the popular wallets used by these networks is the MetaMask wallet. However, before you can store their supported tokens on MetaMask, you need to connect the networks to your wallet. That takes us to the focus of this guide. Below, we’ll acquaint you with the steps on how to connect Avalanche network to Metamask wallet. So, stay tuned as we get started.
What is MetaMask?
MetaMask is a popular digital wallet that is available in both web and app versions. It offers an easy user interface for storing and transferring crypto assets.
It gives you the opportunity as a user to connect with DeFi ecosystems on Ethereum and other blockchain networks including Binance Smart Chain, Polygon, and Avalanche. Ultimately, it’s a very reliable and safe crypto wallet for storing crypto assets.
A MetaMask wallet is very easy to set up. If you are not familiar with the steps, you can follow our guide on how to set up a MetaMask wallet for more details.
What is the Avalanche Network?
Avalanche, abbreviated as AVAX, is an open-source platform that was developed by the Ava labs team in the United States in the year 2020. The network helps in developing and launching decentralized apps (DApps) and enterprise blockchain installations in a solitary, highly scalable ecosystem.
The Avalanche network is often dubbed a Layer 1 Ethereum killer. That’s because it has grown in popularity in recent years and is a popular Ethereum alternative due to its lower transaction charges and faster transaction duration. The network attempts to address the security, centralization, and, most importantly, scalability issues that have plagued previous blockchains.
The Avalanche network also employs the Proof of Stake consensus protocol. Transaction times are said to be as low as 3 seconds, and it can process over 4500 transactions per second. Avalanche is seen as a viable alternative for decentralized finance due to its low costs and swift transfer duration. As a result, Avalanche has piqued the curiosity of most DeFi users because of how highly rated it is.
The Avalanche Ecosystem
Compared to other DeFi blockchains, Avalanche is partitioned into three independent blockchains. They include Exchange Chain (X-Chain), Contract Chain (C-Chain), and Platform Chain (P-Chain).
- X-Chain: This is Avalanche’s exchange network for developing and exchanging AVAX tokens and other digital assets. Fees are disbursed in AVAX tokens, similar to how you pay Ethereum fees in ETH or how you pay Smart Chain fees in BNB.
- C-Chain: This is Avalanche’s contract chain, where developers write smart contracts for DApps. It is also compatible with the Ethereum Virtual Machine (EVM). As a result of it being compatible with EVM, anyone in the cryptosphere can use it to deploy Ethereum smart contracts.
- P-Chain: This network chain stabilizes network validators, traces existing subnets, and supports the generation of exotic subnets.
That completes a quick rundown on the different blockchains under Avalanche. Ultimately, Avalanche’s speed and scalability are aided by the fact that each blockchain serves a distinct purpose.
The Avalanche (AVAX) Token
Avalanche has its utility token referred to as AVAX. This token essentially connects all of the blockchains. AVAX features a limited number of 720 million tokens, which can be staked to authenticate the network, employed for transaction fees, and utilized as a unit across all subnets.
How to Connect Avalanche to MetaMask
The MetaMask wallet is connected to the Ethereum mainnet by default. So, you must add Avalanche’s network details to the extension before you can connect it to your wallet. To proceed, follow the steps below:
- Start by clicking the network menu in your wallet extension
- Next, choose [Add Network] from the drop-down menu.
- A page indicating [Add a network] will then be diverted to you. All you need to do is to copy and paste the details below, then hit the [Save] button.
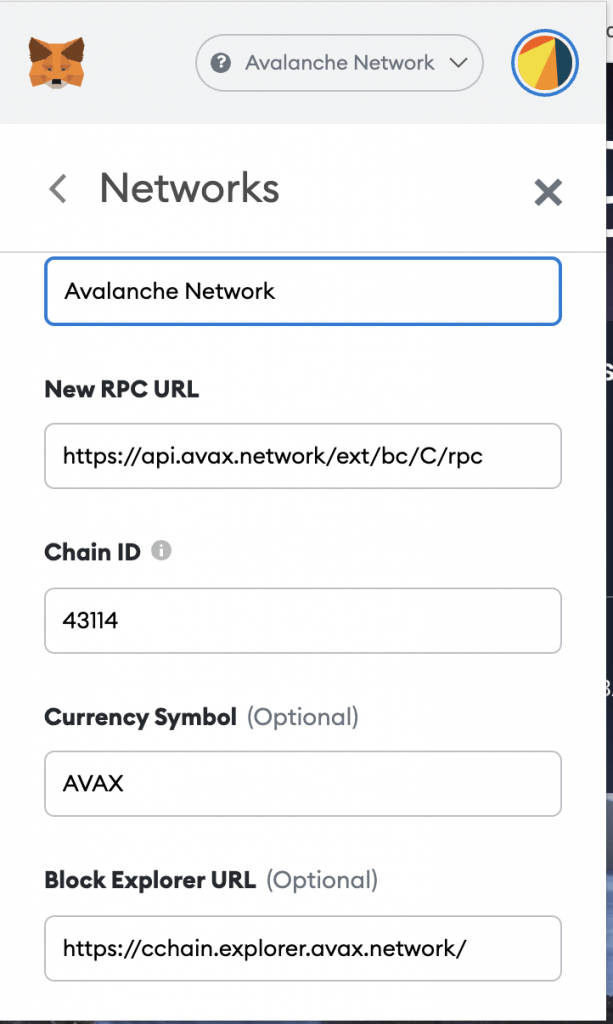
- Network Name: Avalanche Network
- New RPC URL: https://api.avax.network/ext/bc/C/rpc
- Chain ID: 43114 or 0xa86a
- Currency Symbol: AVAX
- Block Explorer URL: https://cchain.explorer.avax.network/
- Having filled in the relevant details and saved them, your MetaMask wallet will then be connected to the Avalanche network.
How to Send AVAX Tokens to MetaMask
You can now transfer Avalanche tokens (AVAX) from another Avalanche wallet to MetaMask after connecting to the Avalanche network. However, always keep in mind that there are three blockchains in the Avalanche network. It’s worth noting that only the C-Chain is compatible with MetaMask, which implies you can only transfer AVAX tokens to your MetaMask wallet via the C-Chain blockchain.
So, you have to be careful or else you risk losing your tokens if you end up choosing the incorrect chain. Having known that, follow the steps below to send AVAX tokens to MetaMask
- Start by signing in to your Avalanche wallet, remember to keep your seed phrase safe and secure, locate your balance at the top to see where your AVAX tokens are. Meanwhile, if you have the tokens stored in your X-Chain wallet, you have to transfer your AVAX tokens from there to your C-Chain wallet before sending them to MetaMask. To do that,
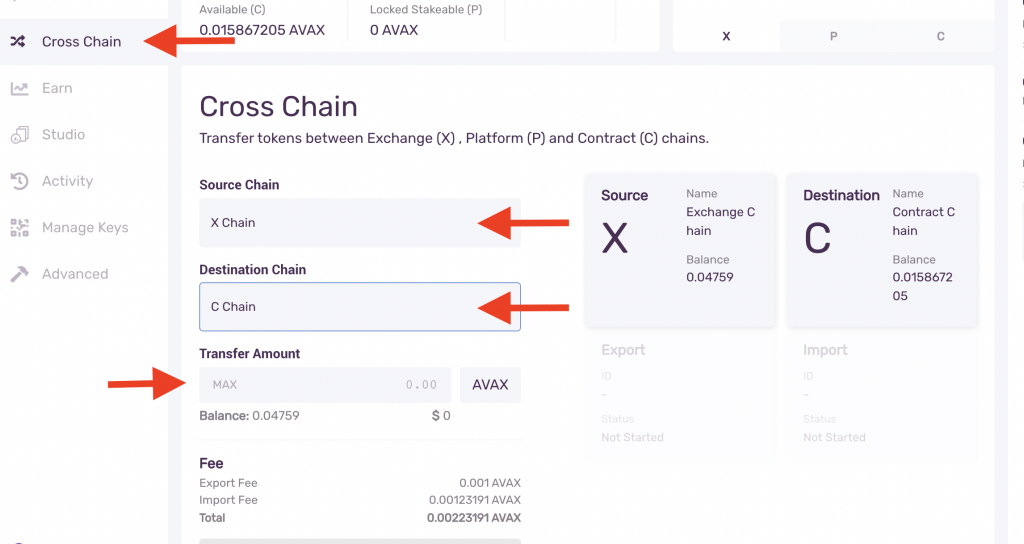
- Proceed to the left menu bar, and select [Cross Chain].
- Next, All you have to do is select [C Chain] as the chain of destination.
- Then, hit the [Confirm] button after entering the amount you want to send from your X-Chain wallet. However, it’s worth noting that there will be a little transaction fee during the exchanging process. Proceed to step 2 once you’re done.
- Hover to the left menu bar and click on [Send].
- Then, select [C]. when you’re asked for the source chain
- Proceed by entering the amount you’d like to transfer to MetaMask in the provided box.
- Next, you have to copy the address from your MetaMask wallet.
- Once copied, return to your Avalanche wallet and paste the MetaMask wallet address into the [To Address] column.
- To transfer, check the gas fee and hit the [Confirm] button. The AVAX will then appear in your MetaMask wallet as soon as the transaction is confirmed.
Conclusion
There you have it! These are some of the things you need to know about connecting the Avalanche network to the MetaMask wallet. We hope you find this tutorial to be helpful. Sending AVAX tokens to your Avalanche-connected MetaMask and sending AVAX tokens out of your MetaMaske wallet can be perplexing at first. But, in time, you’ll grow accustomed to it.
Furthermore, once your tokens have been transferred to the Avalanche blockchain, you can begin trading and swapping ARC 20 tokens.